Jumper Wire: Types, Uses, Pin Configuration, and Complete Guide for Electronics Projects
Overview
Introduction
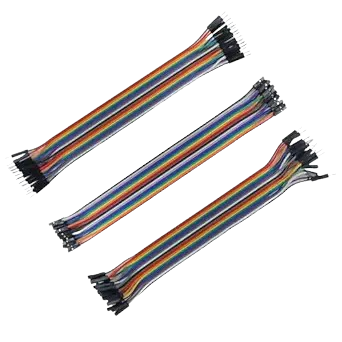
When we talk about basic tools in electronics, one of the most commonly used items is the jumper wire. These small and simple wires are the backbone of breadboard projects, prototypes, and circuit testing. Without them, building or experimenting with circuits would be almost impossible. They allow you to make quick connections between components, modules, and boards without the need for soldering.
Jumper wires may look very simple, but their role in learning and working with electronics is huge. Whether you are a beginner experimenting with an LED circuit or an engineer working on a new prototype, jumper wires are always needed.What is a Jumper Wire?
A jumper wire is a short conductor with insulated covering, used to connect two points in a circuit. They are designed to provide temporary or semi-permanent connections. Instead of permanently soldering components together, jumper wires allow you to quickly plug and unplug parts while testing or making changes. They usually come with connectors at their ends, such as male pins or female sockets, so they can easily fit into breadboards, headers, or modules. These wires are very flexible and reusable, making them a must-have accessory in any electronics kit.Key Features of Jumper Wires
Jumper wires have certain features that make them ideal for electronic projects:-
Good Conductivity: Made of copper or tinned copper, ensuring smooth current flow.
-
Durable Insulation: Coated with PVC or flexible plastic to protect from damage.
-
Different Lengths: Common lengths are 10 cm, 20 cm, 30 cm, and more.
-
Variety of Connectors: Available with male-to-male, male-to-female, or female-to-female pins.
-
Color Coding: Usually come in multiple colors such as red, black, yellow, blue, and green for easy identification.
-
Reusable: Can be used many times across different projects.
Types of Jumper Wires
Based on the type of connector pins, jumper wires are classified into three main types:-
Male to Male Jumper Wire
- Both ends have male pins.
- Used mainly for breadboard to breadboard or breadboard to module connections.
-
Male to Female Jumper Wire
- One end has a male pin, and the other has a female socket.
- Perfect for connecting sensors or modules that have female headers.
-
Female to Female Jumper Wire
- Both ends have female sockets.
- Useful for connecting two modules or boards that have male pins.
Pin Configuration and Color Coding
Unlike microcontrollers or ICs, jumper wires don’t have a fixed pin configuration. Instead, the ends of the wires act as connectors. Male pins can be inserted into female headers or breadboards, while female sockets are used to receive male pins. To make connections easier, jumper wires are often color-coded. For example:-
Red: Power (Vcc)
-
Black: Ground (GND)
-
Yellow/Green/Blue: Signal lines
Applications of Jumper Wires
Jumper wires are extremely versatile and are used in countless electronic projects. Some common applications include:- Building and testing circuits on breadboards.
- Connecting sensors, modules, and microcontrollers.
- Debugging hardware by quickly adding or removing connections.
- Making educational circuits for students and hobbyists.
- Creating quick prototypes without soldering.
- Extending the reach of circuit connections.
Advantages of Jumper Wires
There are several benefits of using jumper wires in electronics:-
Time-Saving: No need for soldering, connections can be made instantly.
-
Reusable: Can be disconnected and used again in another project.
-
Low Cost: Easily available at very low prices.
-
Beginner-Friendly: Perfect for students and beginners to learn circuit building.
-
Organized Circuits: Helps maintain neat and manageable connections on a breadboard.
Example: Using Jumper Wires in a Simple LED Circuit
To understand how jumper wires are used, let’s look at a basic example of connecting an LED to a microcontroller like Arduino:- Place an LED on a breadboard.
-
Use a male-to-male jumper wire to connect the positive leg of the LED to digital pin 8 of the Arduino.
-
Insert a male-to-male jumper wire from the negative leg of the LED to the ground (GND) of the Arduino.
- Upload a blink program to the Arduino.
Specifications of Jumper Wires
While jumper wires are simple, they have certain technical specifications:-
Conductor Material: Copper or tinned copper
-
Insulation: PVC or plastic
-
Wire Gauge: 22 AWG to 28 AWG (thin enough for breadboards)
-
Connector Type: Male pins or female sockets
-
Available Lengths: 10 cm, 20 cm, 30 cm, 50 cm, and more
-
Color Options: Red, black, yellow, blue, green, white, etc.
Why Jumper Wires Are Important in Electronics
Jumper wires are not just accessories; they are essential tools for learning, experimenting, and building projects. Imagine working on a breadboard without jumper wires — it would be impossible to connect components properly. These small wires make it easy to test designs, find errors, and make changes without wasting time or permanently fixing parts. For students, jumper wires are the first step in understanding how circuits work. For professionals, they are valuable in quickly prototyping new ideas. And for hobbyists, they make electronics fun and engaging.Conclusion
Jumper wires may look simple, but they play an essential role in electronics. They provide flexible, reusable, and cost-effective connections for breadboards and prototypes. With different types such as male-to-male, male-to-female, and female-to-female, they cover all possible connection needs. From small classroom experiments to advanced prototype development, jumper wires are always present. If you are learning electronics or working on new designs, keeping a set of jumper wires in your toolkit is a must.Where to Buy
Prices may vary. Click on "Buy Now" to check current availability and pricing.
Administrator
Frequently Asked Questions
Common questions about Jumper Wire: Types, Uses, Pin Configuration, and Complete Guide for Electronics Projects. Find answers to the most frequently asked questions.
User Reviews & Comments
Share your experience with this IoT Blog. Your feedback helps our community make informed decisions!
Share Your Experience
Help others by sharing your thoughts about this IoT Blog.
Related Blogs
Explore more IoT Blogs in the same category
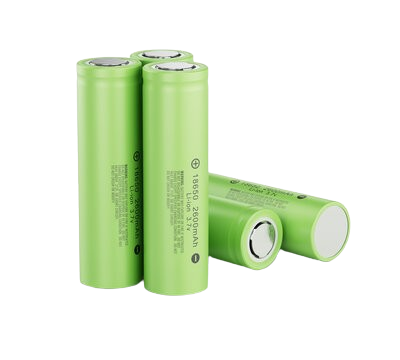
Li-ion Batteries for IoT: Maximizing Performance, Longevity, and Efficiency
Power Supply
Dive deep into the world of Li-ion batteries tailored for IoT applications. This detailed resource covers everything from fundamental principles to advanced optimization techniques. Understand how to choose the right battery, extend device runtime, and enhance overall system reliability, all crucial for your connected innovations.

Solar Panel: Types, Benefits, Installation Cost, and Maintenance Guide for Home & Commercial Use (2025)
Power Supply
Discover everything about solar panels in this complete guide covering types, benefits, installation cost, and maintenance tips. Whether you're planning for home or commercial use, learn how solar energy can reduce your electricity bills and promote sustainability. Ideal for beginners and property owners exploring solar power solutions in 2025.
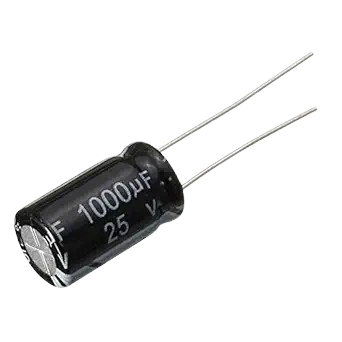
Capacitors: Types, Working, Applications, Selection Guide & Complete Technical Overview
Power Supply
Discover everything about capacitors in this complete technical guide. Learn capacitor types, working principles, real-world applications, and how to choose the right one for your circuit. Ideal for students, engineers, and electronics enthusiasts seeking reliable, accurate information
No Reviews Yet
Be the first to share your experience with this IoT Blog!