Ultrasonic Distance Measurement Project Using Arduino
Overview
Introduction
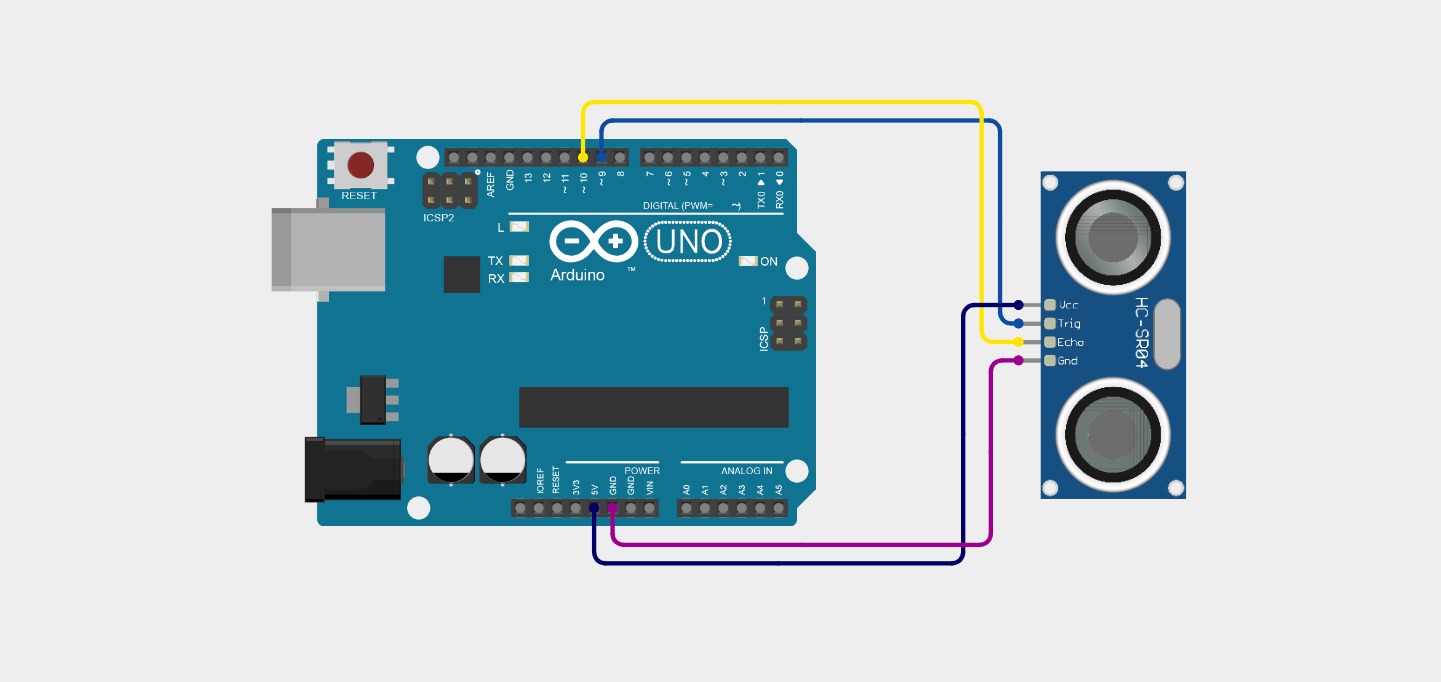
This project demonstrates how to measure the distance between an object and a sensor using an Arduino and an ultrasonic sensor (HC-SR04). Ultrasonic sensors use sound waves to detect the distance of an object without touching it.
In this project, the Arduino sends a signal to the ultrasonic sensor, and the sensor emits ultrasonic sound waves. These waves travel through the air, hit an object, and return back to the sensor as an echo. The Arduino measures the time taken for the echo to return and calculates the distance using a mathematical formula.
The calculated distance is then displayed on the Serial Monitor in feet.
This project helps students understand sensor interfacing, Arduino programming, and real-time distance measurement systems.
Arduino Code

#define trigPin 9
#define echoPin 10
long duration;
float distance_cm;
float distance_ft;
pinMode(echoPin, INPUT);
delayMicroseconds(2);
delayMicroseconds(10);
digitalWrite(trigPin, LOW);
distance_ft = distance_cm / 30.48;
Serial.print(distance_ft);
Serial.println(" ft");
}
Step-by-Step Code Explanation
1. Defining the Sensor Pins
#define echoPin 10
In this section, we define which Arduino pins are connected to the ultrasonic sensor.
The trigger pin is connected to Arduino digital pin 9, and the echo pin is connected to Arduino digital pin 10.
The trigger pin is used to send the ultrasonic signal, while the echo pin is used to receive the reflected sound wave from the object.2. Declaring Variables
float distance_cm;
float distance_ft;
duration
This variable stores the time taken by the ultrasonic signal to travel to the object and return back.
distance_cm
This variable stores the calculated distance in centimeters.
distance_ft
This variable stores the converted distance in feet.
3. Setup Function
pinMode(echoPin, INPUT);
The setup() function runs only once when the Arduino starts.
First, the serial communication is started using: Serial.begin(9600);This allows the Arduino to send data to the Serial Monitor so we can see the distance values on the computer.
Next, we configure the pin modes.The trigger pin is set as OUTPUT because Arduino sends a signal from this pin.
The echo pin is set as INPUT because Arduino receives the returning signal from this pin.
4. Loop Function
The loop() function runs continuously after the setup function finishes.
This means the Arduino keeps measuring the distance repeatedly.5. Sending Trigger Signal
delayMicroseconds(2);
First, we set the trigger pin to LOW for a short time. This ensures that the signal starts from a clean LOW state.
delayMicroseconds(10);
digitalWrite(trigPin, LOW);
Next, the trigger pin is set to HIGH for 10 microseconds.
This short pulse tells the ultrasonic sensor to send ultrasonic sound waves into the air.
After that, the trigger pin is set back to LOW.
6. Receiving the Echo Signal
The pulseIn() function measures how long the echo pin stays HIGH.
This time duration represents how long the ultrasonic sound wave took to:- Travel from the sensor to the object
- Bounce back from the object
- Return to the sensor
The measured time is stored in the duration variable.
7. Calculating Distance
The distance is calculated using the speed of sound.
The speed of sound in air is approximately 0.034 cm per microsecond.
The formula used is: Distance = (Time × Speed of Sound) / 2The division by 2 is required because the sound wave travels to the object and back to the sensor.
8. Converting Distance to Feet
Since 1 foot = 30.48 cm, the program converts the distance from centimeters into feet.
This makes the result easier to understand for measurement purposes.9. Displaying the Distance
Serial.print(distance_ft);
Serial.println(" ft");
These lines print the calculated distance on the Serial Monitor.
Example output:Object Distance: 2.45 ft
Object Distance: 3.10 ft
Object Distance: 1.80 ft
This allows students to see the real-time distance measurement.
10. Delay Between Readings
This delay pauses the program for 500 milliseconds before taking the next reading.
Without this delay, the Serial Monitor would update too quickly and become difficult to read.Project Overview
The Ultrasonic Distance Measurement using Arduino is a simple electronics and embedded systems project that is designed to measure the distance between a sensor and an object. This project uses an Arduino microcontroller and an HC-SR04 ultrasonic sensor to detect how far an object is located from the sensor.
The main purpose of this project is to demonstrate how ultrasonic sound waves can be used to measure distance accurately without physically touching the object. Ultrasonic sensors work by sending high-frequency sound waves into the air. When these sound waves hit an object, they bounce back toward the sensor. The Arduino measures the time taken for the sound wave to travel to the object and return back to the sensor.
By calculating this time and using the known speed of sound, the Arduino can determine the exact distance between the sensor and the object. In this project, the calculated distance is displayed on the Serial Monitor in feet, allowing users to see the real-time distance measurement.
This project is very useful for students who are learning Arduino programming, sensor interfacing, and embedded system fundamentals. It provides practical experience in connecting sensors with a microcontroller and understanding how real-time measurement systems work.
Ultrasonic distance measurement technology is widely used in many modern applications. For example, it is commonly used in robot obstacle detection systems, automatic parking sensors in vehicles, industrial automation systems, water level monitoring systems, and smart measurement devices. Because ultrasonic sensors are inexpensive, reliable, and easy to use, they are very popular in educational and prototype electronics projects.
In this Arduino project, the ultrasonic sensor continuously measures the distance between itself and nearby objects. The Arduino processes the sensor data, converts the measurement into feet, and displays the results on the Serial Monitor. As the object moves closer or farther away from the sensor, the distance value updates automatically.Overall, this project helps students understand the working principle of ultrasonic sensors, distance measurement techniques, and basic Arduino programming concepts. It is a beginner-friendly project that builds a strong foundation for more advanced robotics and automation systems.
Advantages of Ultrasonic Distance Measurement
1. Non-Contact Distance Measurement
One of the biggest advantages of ultrasonic distance measurement is that it can measure the distance of an object without making physical contact. The ultrasonic sensor uses high-frequency sound waves to detect objects, which means it can measure distance even when the object cannot be touched directly. This feature makes it very useful in automation and safety systems.
2. High Accuracy for Short Distances
Ultrasonic sensors such as the HC-SR04 provide good accuracy for short-range distance measurements. In most Arduino projects, these sensors can measure distances from approximately 2 cm to 400 cm with reliable results. This makes them suitable for robotics, obstacle detection, and small automation projects.
3. Easy to Interface with Arduino
Another major advantage of ultrasonic sensors is that they are very easy to interface with microcontrollers such as Arduino. The HC-SR04 sensor only requires two digital pins (Trigger and Echo) to operate, which simplifies the circuit design and programming process.
4. Low Cost and Easily Available
Ultrasonic sensors are very affordable and widely available in electronics markets. Because of their low cost, they are commonly used in educational projects, prototypes, and DIY electronics experiments.
5. Works in Dark Environments
Unlike optical sensors or cameras, ultrasonic sensors do not rely on light to detect objects. Instead, they use sound waves. This means they can work effectively in complete darkness or low-light environments, making them useful in many real-world applications.
6. Useful for Many Applications
Ultrasonic distance measurement technology is used in many modern systems such as:
- Robot obstacle avoidance systems
- Automatic parking sensors in vehicles
- Water level monitoring systems
- Industrial automation systems
- Smart distance measuring devices
Because of its versatility, it is widely used in both educational and industrial applications.
Disadvantages of Ultrasonic Distance Measurement
1. Limited Measurement Range
Although ultrasonic sensors are accurate for short distances, they have a limited measurement range. Most commonly used sensors like the HC-SR04 can measure up to about 4 meters. For longer distances, other technologies such as laser sensors or LiDAR are required.
2. Accuracy Affected by Surface Type
The accuracy of ultrasonic sensors can sometimes be affected by the type and shape of the object surface. Soft or irregular surfaces may absorb sound waves instead of reflecting them properly, which can lead to incorrect distance measurements.
3. Environmental Factors Can Affect Performance
Environmental conditions such as temperature, humidity, and air pressure can slightly affect the speed of sound in air. Since ultrasonic sensors calculate distance using the speed of sound, these factors may introduce small measurement errors.
4. Not Suitable for Very Small or Thin Objects
Ultrasonic sensors may have difficulty detecting very small, thin, or angled objects. If the object does not reflect the sound waves properly, the sensor may not receive a clear echo signal.
5. Interference from Other Ultrasonic Signals
If multiple ultrasonic sensors are used in the same area, they may interfere with each other’s signals. This interference can cause false readings or unstable measurements.
Administrator
User Reviews & Comments
Share your experience with this IoT Blog. Your feedback helps our community make informed decisions!
Share Your Experience
Help others by sharing your thoughts about this IoT Blog.
Related Blogs
Explore more IoT Blogs in the same category
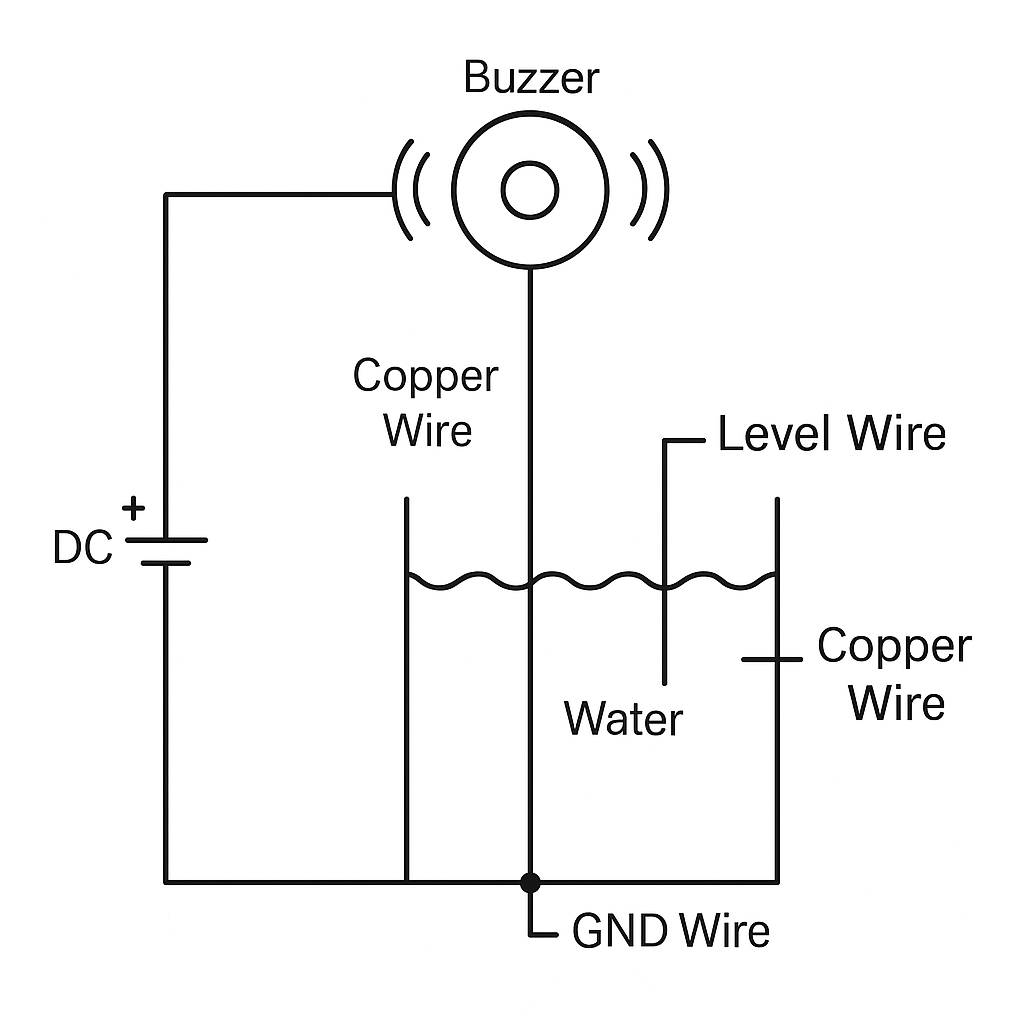
DIY Water Tank Full Alarm Using Copper Wire | No Arduino, No Sensor – Low Cost Project
Homemade Projects
Learn how to make a DIY water tank full alarm using copper wire without Arduino or any sensor. This low-cost homemade water level indicator project helps you prevent tank overflow with a simple circuit using just a buzzer and copper wires.
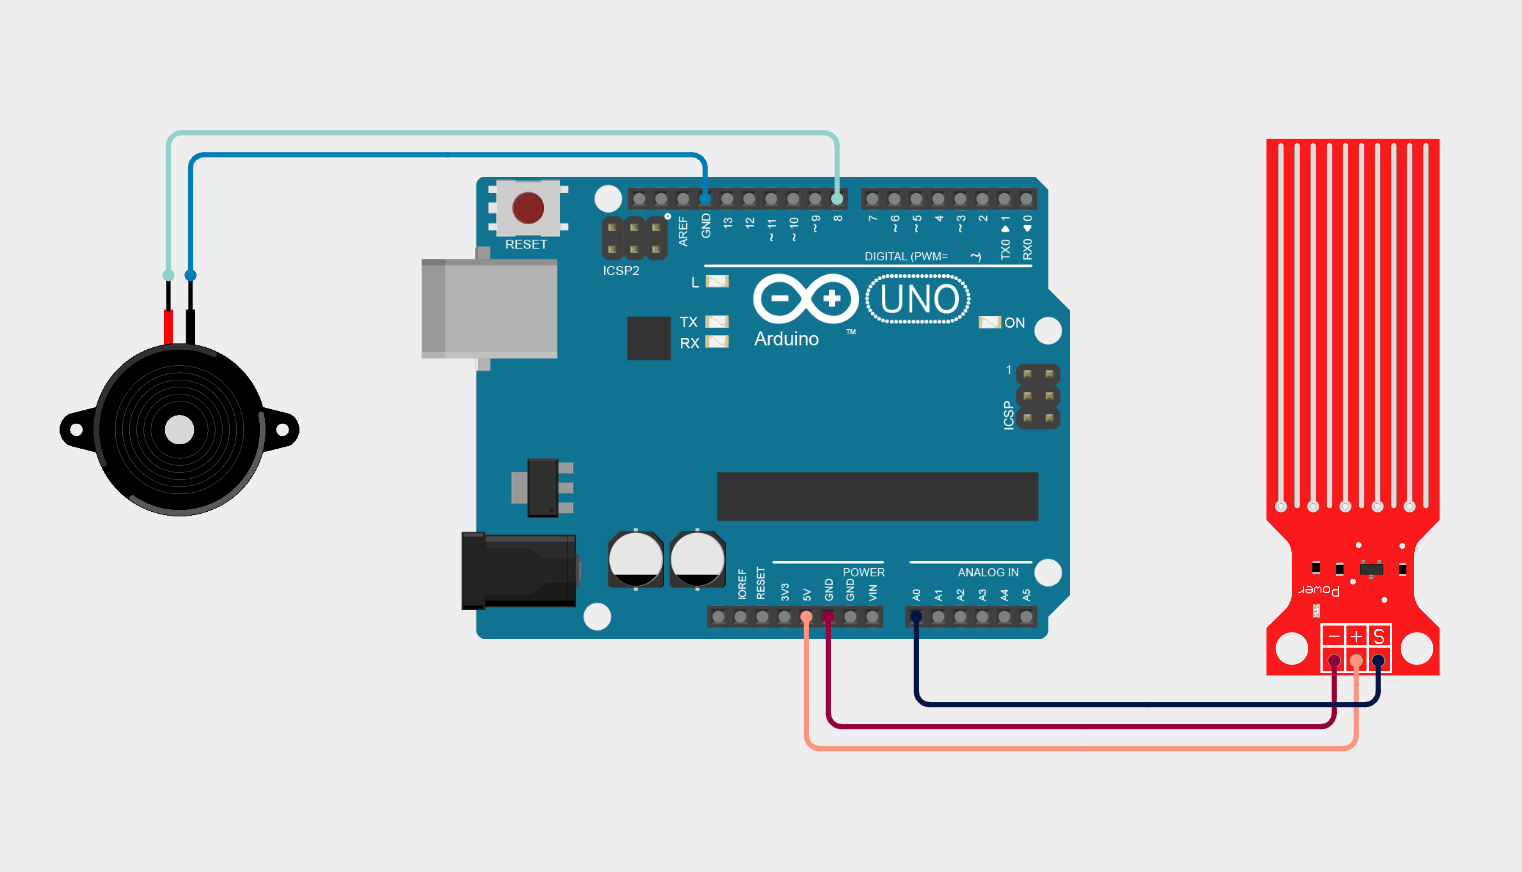
Arduino Water Leak Detection System using Water Sensor and Buzzer
Homemade Projects
This project demonstrates a simple Arduino-based Water Leak Detection System using a water sensor module and a buzzer. The system continuously monitors moisture levels through the sensor and sends analog data to the Arduino Uno.
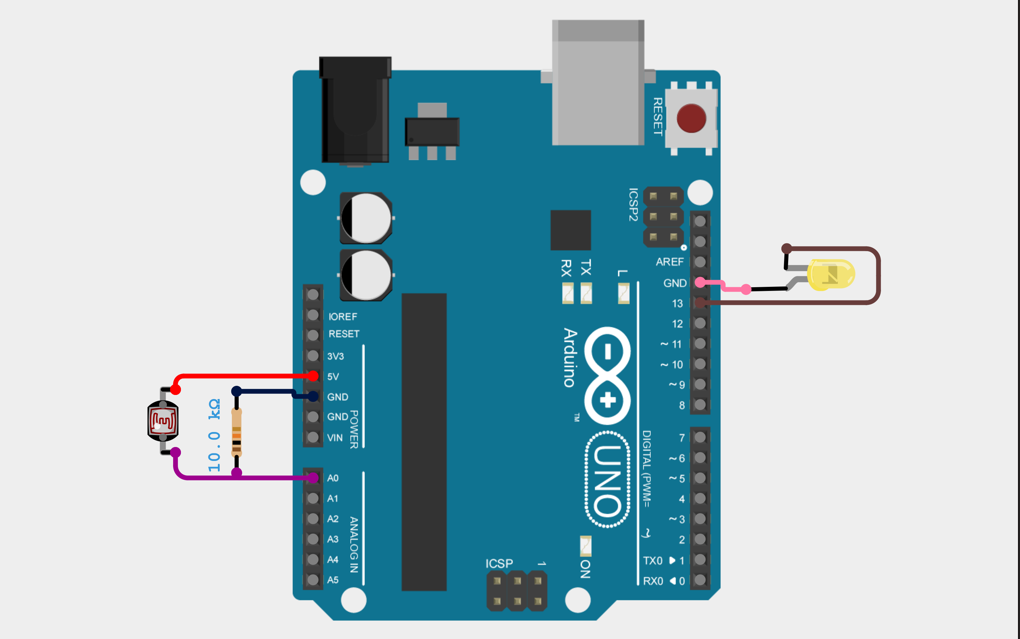
Arduino LDR-Based Automatic Light Control System
Homemade Projects
Automatic light control using Arduino and LDR detects ambient light intensity and automatically switches a light source ON in darkness and OFF in brightness, ensuring energy efficiency and reducing manual effort.
No Reviews Yet
Be the first to share your experience with this IoT Blog!